This article is written for: ❌ Zello Work ✅ Zello Friends & Family
Bridge connects traditional two-way radios with Zello’s powerful push-to-talk (PTT) solution, enabling seamless cross-platform communication so teams can use both the hardware and software that’s optimized for their unique operational environment.

Bridge runs quietly in the background, ensuring non-disruptive interoperability between radio users and Zello. Its latest release expands capability to include both USB and JPS gateways.
Those that have historically utilized Zello’s legacy PC app will find Bridge a vital tool in their communications ecosystem. Zello plans to sunset the legacy PC app in the near future, so we highly recommend migrating to Bridge as soon as possible to ensure you’re receiving the most updated product.
If you’re an existing legacy PC app user, see this section for assistance migrating from the legacy PC app to Zello Bridge.
Compatibility
This application is compatible with USB and JPS gateways. While both gateway types connect radios with communications software, they differ in how they transmit audio; USB gateways require direct USB connection to a PC, whereas JPS gateways generally transmit messages using Radio Over IP (RoIP) technology, meaning audio is delivered via an internet connection.
Common models of these gateways include:
Please note that while above-listed JPS gateways require utilization of Zello Bridge, newer JPS gateway models include updated firmware that enables connection via the JPS management interface.
For example, JPS gateways like the ACU-Z1 and RSP-Z2 already have the Zello Channel API integrated. While they’re compatible with Bridge, they don’t require it. See this JPS documentation for more information.
Bridge is only compatible with channel communications. Because it relies on Zello’s channel API, it can’t be used for 1:1 messages. It’s currently exclusively available in a x64 bit package.
How it Works
Bridge expands Zello’s functionality beyond traditional Android and iOS operating systems, allowing devices operating on proprietary firmware to integrate with the Zello infrastructure.
When configured with either a JPS or USB gateway, Bridge connects two-way radios with Zello, enabling smoother, more tailored PTT communications. It reads a 2-level structure from the configuration file: links and connectors.
- Links share the audio streams between connectors. They’re what ensure communications are transmitted from one connector to the other (i.e. from Zello to your team’s radios).
While links are dependent on their designated connectors, they don’t interact with other links. Each link will have at least two connectors—the Zello API, the JPS gateway, or the USB gateway —and additional, platform-specific configuration attributes that dictate Bridge’s configuration.
Bridge easily supports up to 16 links.
- Connectors are the endpoints you’re connecting using Bridge—for example, Zello’s channel API and a USB gateway. There are three possible endpoints: the Zello channel API, a USB gateway, or a JPS gateway. Each link includes at least two connectors; connectors are required attributes of a link's configuration.
Status Page
One of Bridge’s strengths lies in your ability to monitor its status through a webpage, providing access to real-time updates on your system’s performance. Once you’ve configured your links, their status will be displayed on the dashboard, offering targeted insight into the operations of each of your links and their associated connectors.

The status page is configured under the REST server section of the configuration file. It's accessible by inputting 127.0.0.1:8810 into your browser's URL bar.
Setup
In this article, we'll walk through configuring your instance of Zello Bridge. Additionally, we'll provide context for errors you may receive when using Bridge.
Please note: Zello communicates on multiple domains and subdomains—including zellowork.io. If you experience connectivity issues, consider allowing access by domain name. Consider whitelisting zello.io with a wildcard variable in your firewall. Example: *.zello.io
Step 1: Install Bridge
- Click this link to download Bridge's installation package (version 1.28.1).
- Run the installation package on your computer. Once installed, Bridge will automatically launch.
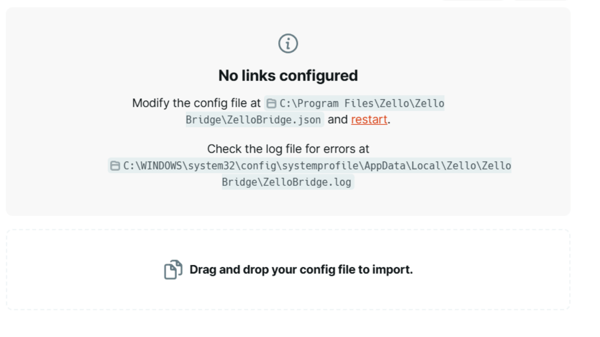
- Open your browser of choice and type 127.0.0.1:8810 in the address bar. This will take you to Bridge's status page, which indicates a successful installation.
Step 2: Configure Bridge
Please note: If you currently uses Zello’s legacy PC app, skip this section and instead refer to the Migration From the Legacy PC App section. The migration process is different (and slightly easier) than the initial configuration process for legacy PC users currently operating with a gateway setup.
Once you’ve installed Bridge, it’s time to edit your configuration file. Configuration files include a few key components:
- The REST server status page (:8810)
- Links
- Log location
Configuration files are included in your Bridge installation package, but please note that you'll need to manually configure the links yourself. To find and edit your configuration file:
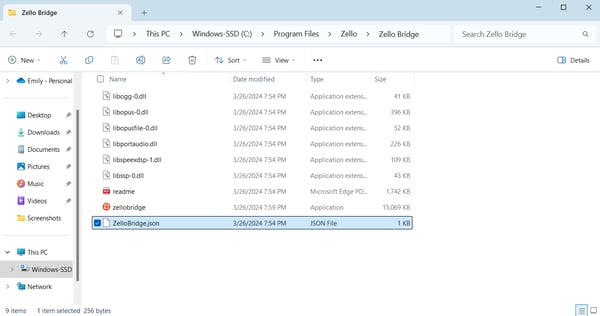
- Locate a file named zellobridge.json on your computer. It’ll likely be present in the Program Files\Zello\Zello Bridge folder, which was downloaded as part of the Bridge installation package.
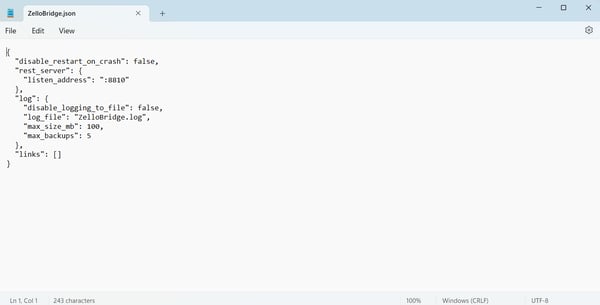
- Open the file in a text editor such as Notepad.
- Edit the configuration file's links to meet your requirements according to the instructions provided in this section.
Please note that the only information you'll likely need to adjust in the configuration file is that pertaining to links (and consequently, their connectors).
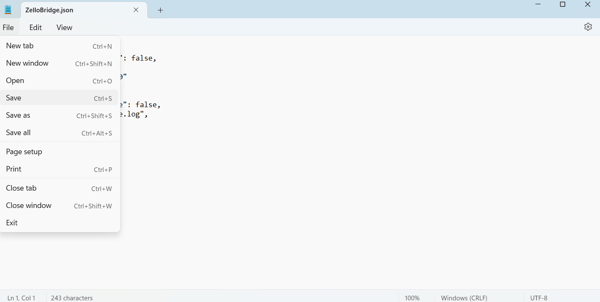
- Save the configuration file.
- Open your browser and go to http://127.0.0.1:8810. Then, click Restart. Your configured links and their respective statuses will be listed on the homepage .

Editing the Configuration File
Zello Bridge will connect the endpoints established in your configuration file. This file will include 1 or more links, each of which have two or more connectors.
Please note that links operate independently from each other, meaning link #1 will not impact link #2. Each configuration file can include up to 16 links.
Connectors are nested under links. They're the communication endpoints you'd like to connect.
To demonstrate, we’ve highlighted the links segment of an example configuration file connecting a USB gateway with the Zello Channel API. You’ll notice that there are two connectors associated with the link, as dictated by the two type attributes:
|
Zello Bridge will connect the endpoints established in your configuration file. This file will include 1 or more links, each of which have two or more connectors. Please note that links operate independently from each other, meaning link #1 will not impact link #2. Each configuration file can include up to 16 links. Connectors are nested under links. They're the communication endpoints you'd like to connect. To demonstrate, we’ve highlighted the links segment of an example configuration file connecting a USB gateway with the Zello Channel API. You’ll notice that there are two connectors associated with the link, as dictated by the two type attributes:
|

|
The configuration file that's included in Bridge's installation package requires manual link configuration. We’ve included an example configuration file in the Downloads section of this article to reference as you build your own file. If you encounter an error after importing your config file, please check that your file matches spacing and formatting shown in the example or original download file. You can use a JSON validator to check for accuracy.
Configuring Links
Link configuration requires three components:
| Link name | Assign your link a name. For example, “Link #1” |
| Connector |
The connector field specifies the endpoints you’re connecting with Bridge (e.g. the Zello channel API and your gateway). This field is a collection. For more information on its configuration, see the Configuring Connectors section below. |
Configuring Connectors
There are 2 possible connector types:
- zello-channel-api
- zello-usb-gateway
Each connector has its own set of configuration parameters. As a reminder, each link will have at least two connectors.
Please see the sections below for a list of each connectors' attributes. The attributes associated with your intended setup should be added to your .pttconfig file. If any of the parameters included in the tables are not applicable to your setup, exclude them from your file.
Please note: When connecting the Zello Channel API, you’ll be required to add a username and channel name to the configuration file. You should create a new user that’s exclusively used for the link you’re configuring. Then, you’ll want to add that user to the channel you’re connecting to the gateway.
Zello Channel API
| Parameter | What is it? | Example Value |
| type | The connector type. | zello-channel-api |
| name |
The connector’s name. If left blank, the channel name (configured below) will appear on the status page. |
Zello Channel A |
| channel_api_url |
This is the entry point for Zello’s channel API. The format for this value is: wss://zellowork.io/ws/ |
wss://zellowork.io/ws/ |
| channel |
The name of your channel you’d like to connect to the gateway. Please note that the channel must be pre-existing by this step. For information on creating channels, see this article. |
ChannelA |
| username |
Username of an existing user profile. See this page for assistance creating a new user. This username should be created specifically for the link you’re setting up. Please note that the username cannot be in use on another device or in another Zello Bridge link. It should be created for a single, specific link. Ensure this user has been added to the channel you’ve assigned in the attribute above. |
user1234 |
| password | The password associated with the username provided above. | mypassword1234! |
| token* |
*Not required for Zello Work accounts. This field is only applicable to Zello Friends & Family users. See this documentation for assistance creating a token. |
USB Gateway
| Parameter | What is it? | Example Value |
| type | The connector type. | zello-usb-gateway |
| name | Assign the connector a name. This can be any string — it isn’t dependent on existing configurations. | USB Gateway 1 |
| playback_device |
The operating system-assigned name of the connected gateway’s playback device. To find this, go to Start > Settings > System > Sound on your Windows computer. |
USB audio device |
| recording_device |
The operating system-assigned name of the connected gateway’s recording device. To find this, go to Start > Settings > System > Sound on your Windows computer. |
USB audio device |
| serial_port |
The operating system-assigned name of the connected gateway’s serial port. The serial port name can be found in your Device Manager. If your device doesn’t have a serial port, leave this field empty. |
COM3 |
| tx_serial_port |
True if the gateway utilizes the serial port line state to start and stop TX message transmission (to radio). This means the tx_line and tx_active_high are in use. False if VOX is active. |
false |
| rx_serial_port |
True if the gateway sets serial port line state to start and stop RX messages (from radio). This means rx_line and rx_active_high are in use. False if VOX is active. |
false |
| tx_line |
The supported values for this parameter are RTS and DTR. This field is dependent on the gateway in use. Please refer to your gateway’s manual for more information. |
rts |
| rx_line |
The supported values for this parameter are CTS, DSR, RING, and CD. This field is dependent on the gateway in use. Please refer to your gateway’s manual for more information. |
cts |
| tx_active_high |
Set this value to True if the active signal level is high. Set it to False if it’s not high. This field is dependent on the gateway in use. Refer to your gateway’s manual for more information. |
true |
| rx_active_high |
Set this value to True if the active signal level is high. Set it to False if it’s not high. This field is dependent on the gateway in use. Refer to your gateway’s manual for more information. |
false |
| activation_db |
The sound level at which Bridge will activate transmission. The accepted values range from -80db (lowest) to 0db (highest). |
-35 |
| deactivation_db |
The sound level at which transmission is deactivated. This cannot be set higher than the activation threshold, and it’s best to set it between 3 and 5db lower. For example, if your activation level is set to -35db, set the deactivation to -37db. |
-37 |
| trigger_time |
The amount of time (in milliseconds) VOX takes to start transmission.
|
200 |
| relaxation_time | The amount of time (in milliseconds) VOX takes to stop transmission. | 700 |
| pause_time |
The amount of time (in milliseconds) the gateway waits between transmission of two messages. This setting helps prevent overlapping messages. Only applicable to VOX messages. |
1000 |
| wake_up_time |
The length in milliseconds of a loud, single-tone signal Bridge inserts before every VOX message. This ensures the radio recognizes the new transmission. Only applicable if tx_serial_port is false and VOX is active. |
0 |
Configuration Demo Video
For further assistance with configuring Bridge, please reference this video .
Migration From the Legacy PC App to Zello Bridge
Please note: Zello will decommission its legacy PC app in the near future. As such, we strongly encourage users to migrate their data to Zello Bridge for the most updated, feature-rich product.
Those currently utilizing the legacy PC app can easily migrate their gateway setups to Zello Bridge using the import wizard. This tool simplifies the process of copying your existing USB gateway configurations into Bridge.
If utilizing the import wizard, ensure your USB gateway device and serial port are connected before proceeding to step 1. Please note that the following steps should be performed on the device the legacy app is currently installed on.
- Locate the configuration file using the following method. Go to Help > About Zello Work. Scroll about halfway through the credits screen until you see the Local storage pathway.
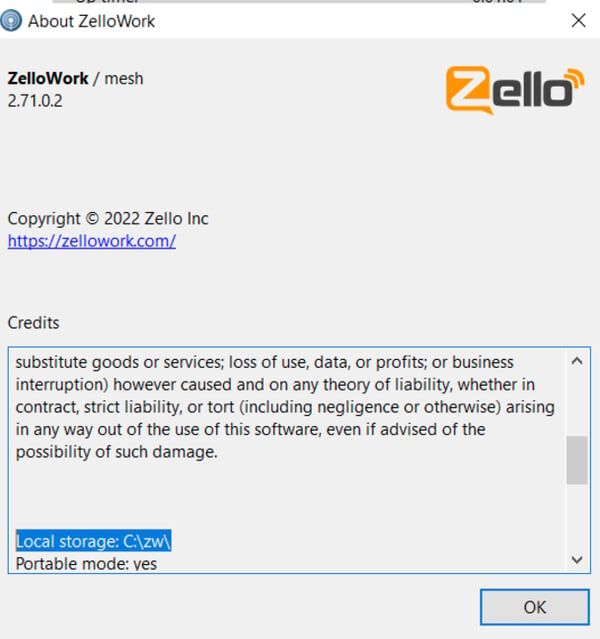
Follow this pathway on your device to locate the legacy PC app’s settings file. It will be named ptt.config
- Sign out of the legacy app (Status > Sign Out). This will ensure Zello Bridge is able to access all necessary hardware.
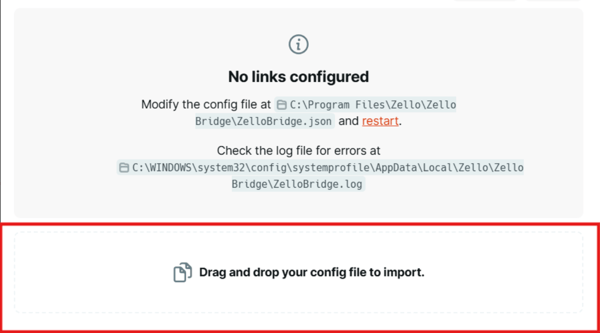
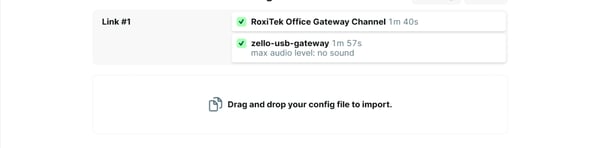
- Drag and drop the settings file into the designated area on the Zello Bridge status page (http://localhost:8810/)
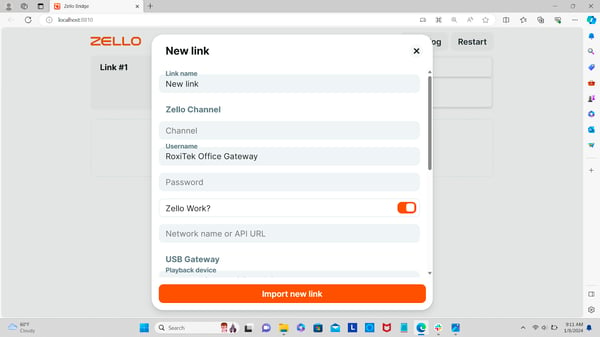
- If the settings file parsed successfully, a New link popup will appear. Most—but not all—of the associated fields should be completed. Since you are not using Zello Work, you will turn the toggle off for the option that says Zello Work?.
-
Fill in any missing values. Note that the gateway’s password and channel name will need to be manually entered
- When the form is completed, click Import new link.
- When the link has successfully imported and both connectors report being online, the new link will appear in the Zello Bridge configuration. Please note it will likely take about 30 seconds for everything to successfully activate.
If there’s an issue with the configuration file, you’ll receive an error message that notes which field is incorrect. Fix the problem values, then click Import new link again.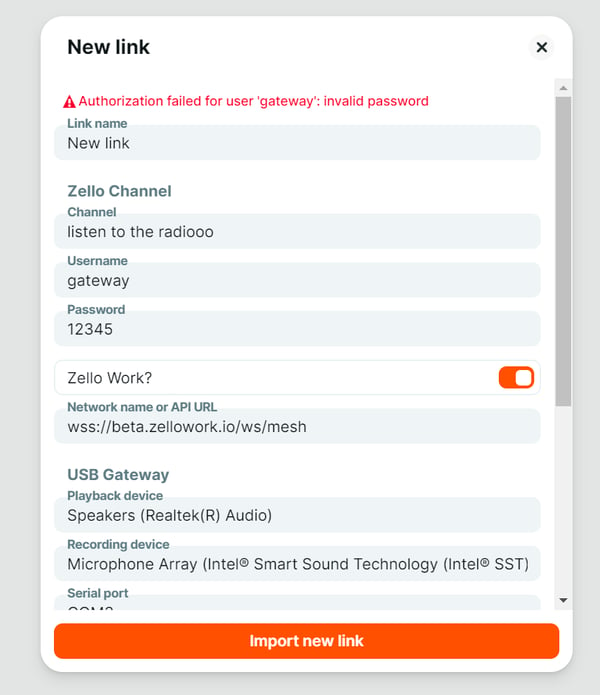
If this method doesn’t work for any reason consider editing the configuration file to include a new link.
Legacy PC app users with pre-existing gateway connections can find many of the required values in the app's Options menu. The following information can be found under Options:
-
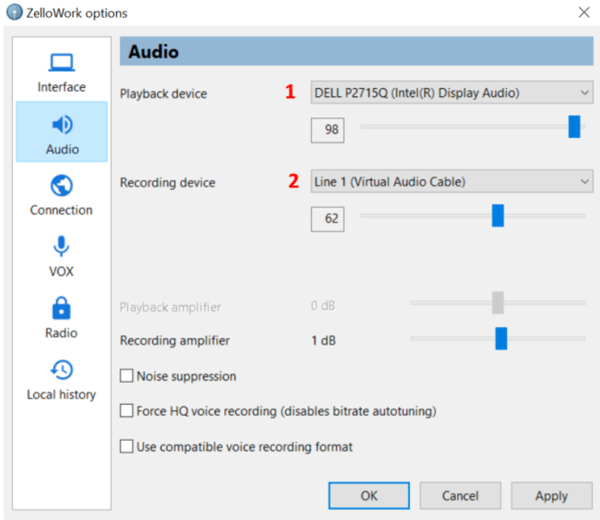
Audio Tab
If either the playback device (1) or recording device (2) are missing from the configuration file, write the names in as they appear here.
Radio Tab
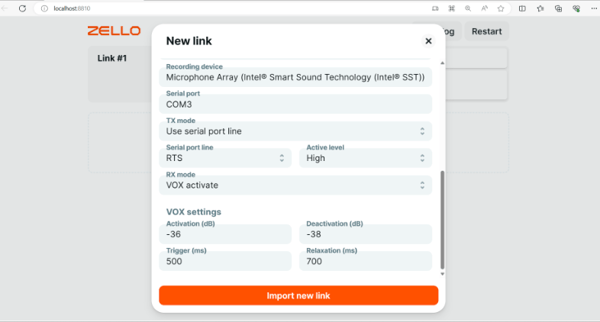
From the TX (PC to Radio) tab, you’ll find the required values for tx_serial_port (3)*, serial_port (4), tx_line (5), and tx_active_high (6). Copy these values as they appear into the configuration file.
*value is TRUE if tx_line and tx_active high are in use
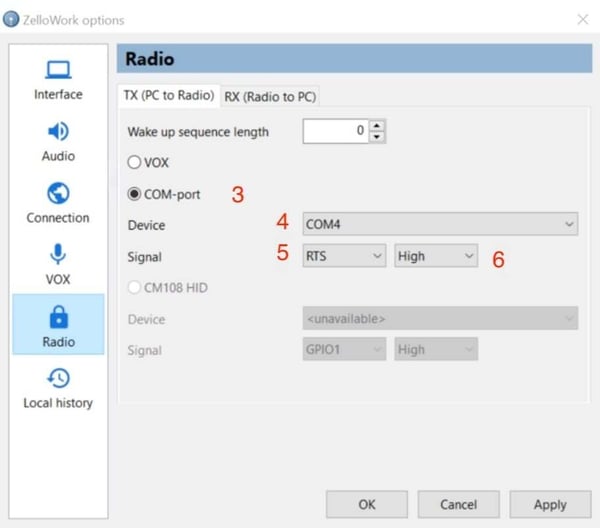
Switch to the RX (Radio to PC) tab and repeat for rx_serial port, rx_line*, and rx_active_high.
*If you utilize VOX mode, leave rx_line blank.
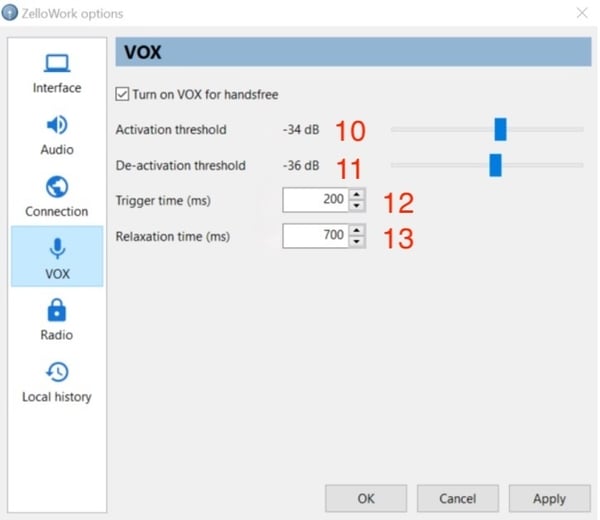
VOX Tab
If you utilize VOX mode, switch to the VOX tab and include the following information in your configuration file: activation_db (10), deactivation_db (11), trigger_time (12), and relaxation_time (13).
Troubleshooting
You may encounter a variety of errors when setting up your Bridge environment. The table below lists the possible error codes and their meanings. If you run into trouble resolving these errors, don’t hesitate to contact our team for tailored assistance.
Error Codes
1000s: Zello Bridge Error
| Code | Meaning | Root Cause/Solution |
| 1001 | Connector isn’t ready to process the incoming audio | Ensure the incoming audio isn’t splitting into a series of short messages. If messages are being split, it’s likely that a connector failed to accept the message. |
| 1002 | Linked connector failed to process the audio | The resolution to this problem is highly dependent on the context provided by the logs. |
| 1003 | Still sending the previous message | Ensure the incoming audio isn’t splitting into a series of short messages. If messages are being split, it’s likely that a connector failed to accept the message. |
| 1004 | Receiving another message |
Check if full-duplex mode is supported for all connectors associated with the link. If it isn’t, turn OFF full-duplex mode in your configuration. As a reminder, full-duplex mode means messages can be sent and received at the same time. |
| 1005 | Unable to send outgoing audio |
This error means Bridge is unable to identify anything to send. First, check your network to confirm proper connectivity. Then, consider increasing your jitter buffer. |
| Code | Meaning | Root Cause/Solution |
| 2001 | Failed to resolve JPS gateway address | Confirm your remote_ip and remote_port configuration values are correct. |
| 2002 | Failed to resolve host address | Confirm your local_ip and local_port configuration values are correct. |
| 2003 | Gateway connection failed |
Confirm that the gateway endpoint is accessible from the Bridge host/specific local endpoint.
Confirm your JPS device is configured correctly and is reachable by the computer running Bridge. |
| 2004 | JPS gateway is offline |
Confirm your network connectivity. If connected, it’s likely you’re experiencing an issue with your JPS hardware. |
| 2005 | Read bad packet |
Your communication is likely being interrupted by one of the following:
|
| 2006 | Read bad audio packet |
You may be experiencing one of the following:
See your gateway's manual for more information. |
| 2007 | Received bad audio packet |
A connector is transmitting an unsupported audio format. Check your gateway’s manual for more information on supported audio formats. |
| 2008 | Read audio timeout |
Your JPS gateway isn’t sending audio packets with the expected speed. Check your JPS device’s manual for information on related settings. Each gateway will carry unique requirements. |
| 2009 | Read buffer starving |
Your JPS gateway temporarily stopped sending audio packets. Consider increasing the value of the jitter_buffer_size value in your configuration file. |
| 2010 | Send buffer starving |
A connector temporarily stopped sending audio packets. Consider increasing the value of the jitter_buffer_size value in your configuration file. |
| 2011 | Send keepalive failed | There was an issue sending messages to the JPS gateway. This likely occurred because of a network connectivity issue. |
| 2012 | Send timeout | The non-JPS connector stopped transmitting audio. Nevertheless, outgoing messages sent to the JPS will be delivered. |
| Code | Meaning | Root Cause/Solution |
| 3001 | Not connected | Bridge is unable to initiate a connection to your Zello Work network. Confirm your network name is correctly entered in the configuration file. |
| 3002 | Invalid Zello credentials |
Confirm your Zello username and password are entered in the zellobridge.json file. If not, adjust the file, click save, then restart Bridge. If credentials are correctly entered, then check your network connectivity. |
| 3003 | Channel offline | You’re either experiencing network connectivity issues, or you’ve been disconnected from the Zello channel configured for your gateway. |
| 3004 | Opus encoder failed | Bridge failed to create an opus packet, OR there’s a problem with the audio received from a connector. |
| 3005 | Opus decoder failed |
An invalid opus packet was received from the Zello connection. Likely causes include one of the following:
|
| 3006 | Start stream failed |
Unable to start an outgoing message. If you find this occurring often, check the talk priority assigned to the user account associated with Bridge. Consider decreasing the channel talk priority of the account. |
| 3007 | Stop stream failed | The current message was likely interrupted by another channel user. |
| 3008 | Error received | Bridge received an error from the channel API. |
| 3009 | Kicked |
The Zello credentials used by this Bridge connector was signed in on another client device. Keep in mind that a single Zello account can only be used on one device at a time. |
| Code | Meaning | Root Cause/Solution |
| 4001 | Audio device not connected | Ensure the correct audio device is connected. Confirm the audio device’s name through your Device Manager. |
| 4002 | Serial port not connected | Connect the USB and serial device, or check the existing serial ports in the operating system. |
| 4003 | Audio device failed | Check your audio device for a driver update. |
| 4004 | Serial port failed | Reconnect and/or restart the device that provides the serial port. |
| 4005 | Port audio library failure | Check your audio device for a driver update. |
| 4006 | Audio recording overflow | Some recorded audio samples have been dropped. Check your host device’s performance and confirm there aren’t any updates for your audio device’s driver. |
| 4007 | Audio recording underflow |
Some audio samples were not recorded, resulting in chunks of silence being delivered to Bridge. Check your audio device for driver updates. |
| 4008 | Recording buffer full | Some audio samples have dropped. |
| 4009 | Resampling failure | To fully understand what’s causing this issue, we’ll need to investigate a log. Please reach out to [email protected]. |
Using VOX on Zello Bridge
Zello Bridge also supports sharing audio without a gateway device using VOX.
- With a traditional two way radio, you can share audio from your radios into Zello one way.
- With a VOX enabled radio, you can share audio to and from Zello two ways.
Requirements for using VOX with your radios:
-
A USB soundcard
-
Cables that connect from your radio’s microphone and speaker jacks to your sound card, functioning as a microphone and speaker input/output
Configuration
You will need to edit your Bridge configuration file using the instructions provided here. When using external hardware like a USB soundcard, the playback_device and recording_device Values in your config file should reference the USB soundcard. For example
Please note: You do not need Radios to use VOX on Bridge. However, you must ensure that the playback_device recording_device values match the audio source you intend to use, as configured in your Windows sound settings.
Example JSONs
Zello Bridge v1.28 ZFF USB Example.json1 KB
Zello Bridge v1.28 ZFF VOX Example.json1 KB