
This article is written for: ✅ Zello Work ❌ Zello Friends & Family.
Zello's Management Console is the centralized hub where admins configure their network. It's where you establish settings; add channels, users, and gateways; and manage your subscription. Think of it as your network's mission control—one unified platform for managing your company's private communications.
Prefer to watch? See the Management Console 101 video series for a guided demo.
A Note About the Management Console's Interface
In early 2025, Zello released a refresh to the Management Console's appearance. New networks created after this release will be automatically shown the updated interface; existing networks can choose if they'd like to enable this refresh from the Management Console's Settings page (Settings > Web Console > General). 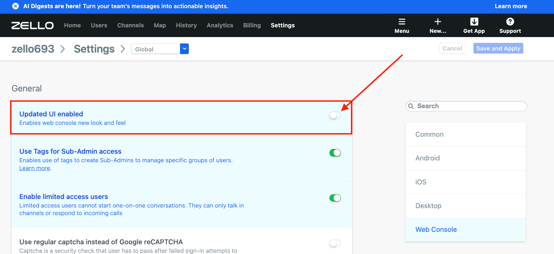
Note that this update is exclusively visual—functionality remains the same on both versions. In this article, we'll refer to the new version as the "updated interface" and the pre-existing version as the "legacy interface."
Accessing the console
Who can access it?
Only network admins can access the Management Console. Learn more about admin responsibilities, including adding secondary and sub-admins.
How to sign in
-
In a web browser, go to [yournetworkname].zellowork.com. Your network name was assigned when your trial was created.
-
Enter your username and password.
If you've forgotten your credentials, contact us at [email protected]. If you're a sub-admin who's forgotten your password, reach out to your network's main admin.
The Home tab
After you sign in, you land on the Home tab—a high-level overview of your network's configuration, plus shareable download links.
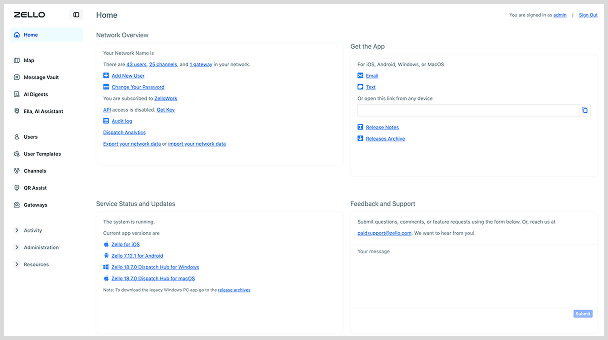
What's on the Home tab
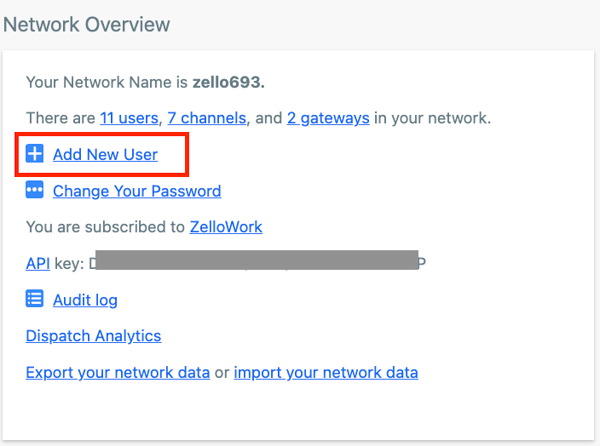
The Network Overview panel gives you a bird's-eye view of your network and how it's used.
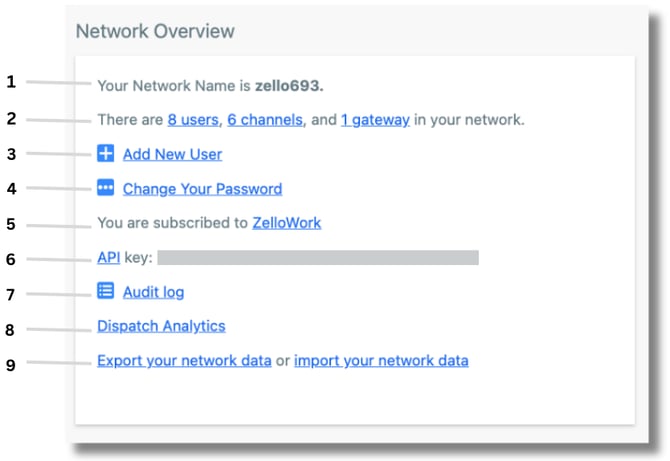
It includes:
- Network name — the name of your network.
- User, channel, and gateway tallies — quick counts of everything configured in your network.
- Add New User — one of several ways to add a user.
- Change Your Password — updates the password for the signed-in user. Learn more about changing passwords.
- Subscription status — your current Zello Work plan.
- API — lets you embed Zello channels in your own application.
- Audit log — records all actions taken by admins (primary, secondary, and sub). For example, if a secondary admin adds a user to a channel, that action appears here.
- Dispatch Analytics — if you use dispatch channels, opens insights such as average time-to-answer, call volume, active dispatchers over time, and call length.
- Export/Import network data — most often used when cloning a network. ⚠️ Imported data may overwrite existing data.
Get the app
Use the Email and Text links to send others an app download link. The link includes sign-in instructions and your network name.
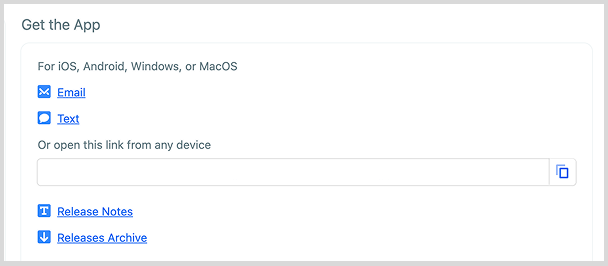
- Release Notes explain important app updates.
- Release Archive provides download links for current and previous app versions.
Service status and updates
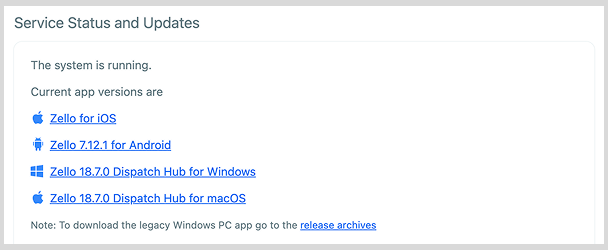
The first line of this panel shows Zello's current system status. You can also download the latest app version for your operating system here.
Feedback and support
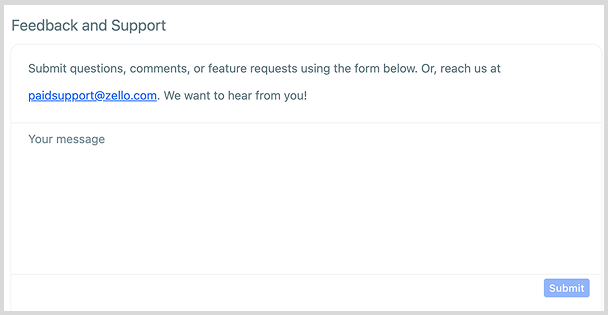
Submit feedback, questions, or feature requests using the Your message box, or email us directly at [email protected]. Support is available 24 hours a day, 7 days a week. You can also submit a ticket.
Managing users
The Users tab lists every user configured in your Zello Work network.
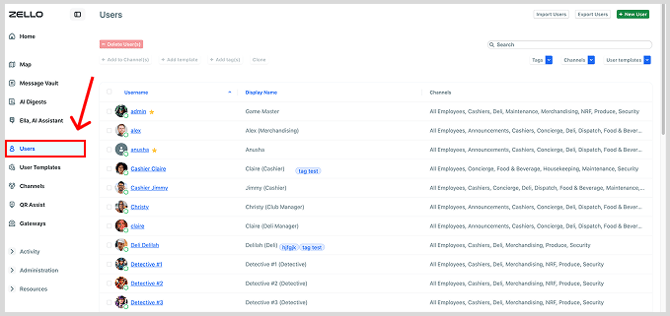
From the Users tab, admins can:
- Add New users to the network
- Delete users
- Import a CSV file of new users/ export existing user details
- Add users to channels
- Add and apply user templates
- Add tags
- Clone user details
User profile
Clicking on a user's username will take you to their profile. From the user profile screen, admins will see four panes: User Details, Channels, Direct Contacts, and User Settings.
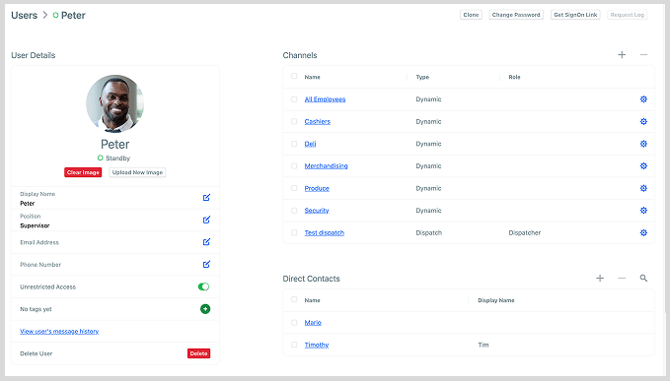
User Details — Enter or confirm the user's email, phone number, position, tags, and two-factor authentication (2FA). (2FA must be enabled at the network level by an admin.) If Message Vault is enabled, you can also view this user's message history here.
Channels — Lists every channel the user belongs to, including the channel name, channel type, and the user's assigned role (if any).
Direct Contacts — Users can send private, one-to-one messages only to their direct contacts. Add a contact with the + button at the top of this panel. Note: users in the same team channel automatically become direct contacts.
User Settings — Configure web console access (i.e., whether the user is an admin), applied user template, cloud history, and location tracking. These are set when the user is created but can be edited anytime.
From the profile you can also clone the user, send a SignOn link, reset their password, delete them, or request a log.
Please note: users that are included in the same team channel will be automatically established as direct contacts. Learn more about channel types.
Adding users
You can add users to your network in three ways:
- From the Home page's Network Overview panel.
- From the Users tab.

- From the + New button in the top navigation bar (legacy interface only—the updated interface doesn't include this button).
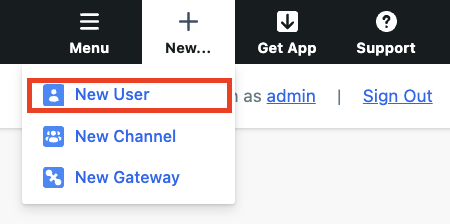
Each option prompts you to set the new user's username, password, and initial network permissions. To finish, click Create and Invite User > Send Instructions. The new user receives an email with login instructions and then appears on the Users page.
Related reading:
-
Creating SignOn links for easy user onboarding — SignOn links let users sign in without entering a username, password, and network name. They're valid for 48 hours by default.
- Importing new users and exporting user data — upload a CSV to add users in bulk.
- Adding users by cloning an existing record — useful when many users need identical permissions.
Managing channels
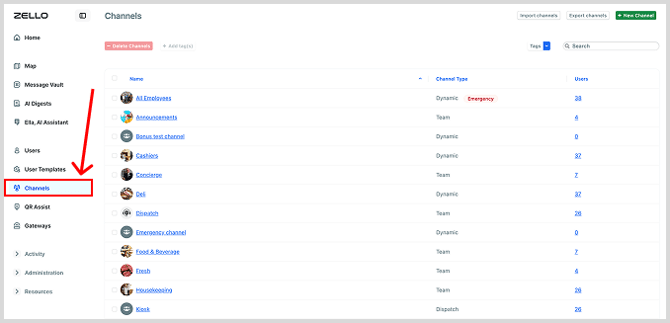
The Channels tab displays every channel in your network. From here you can delete channels, add tags, import or export channels, and add a new channel. Click a channel's name to open its profile.
The channel profile
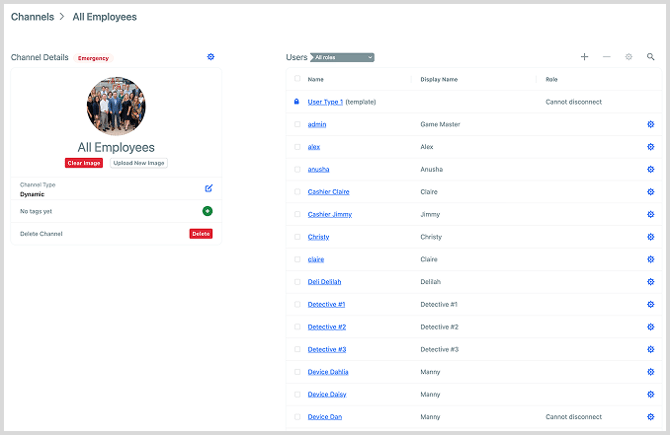
Each channel's page has three sections:
Channel Details — Shows the channel type, tags, and advanced settings (message length, interruption time, and more). You can also set the channel's profile picture here.
Users — Lists everyone in the channel. Add members with the + button.
Roles — Assign members special permissions such as talk priority, the ability to send channel alerts, the ability to disconnect from the channel, and communication capabilities. Learn more in Setting Up User Roles.
Adding a new channel
You can add a channel two ways:
- Channels tab > + New Channel.

- The + New button in the top navigation bar (legacy interface only).
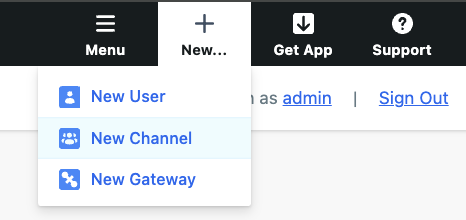
Either option prompts you to name the channel, choose its type (Dispatch or Group), and add users. You can later change a Group channel's subtype (Dynamic, Team, or Hidden), but a Dispatch channel type cannot be changed after creation.
Note: Channels can't be renamed after creation. To configure a large number of channels at once, use channel import.
Network settings
Admins can establish global, per-platform network settings from the console. These settings standardize configuration across the network and they can be accessed by clicking the Settings tab.
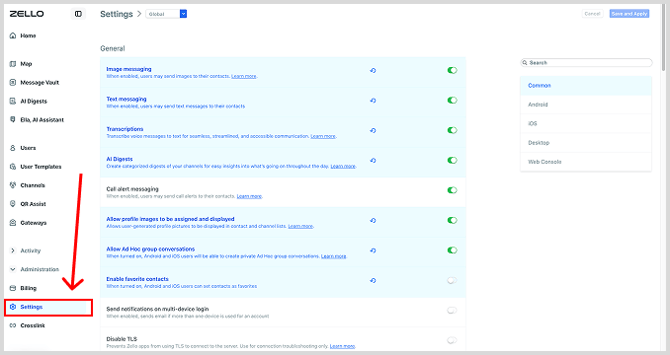
Some settings appear in blue, meaning they've been changed from their default state and are now locked on user devices—end users can't change them. Learn more in Blue Settings in the Management Console.
Why manage settings centrally? Global settings let IT administrators or system owners define the right configuration for the whole network—helpful when everyday users may not understand niche requirements, or when different environments have different needs (a construction site vs. a retail store, for example).
Related reading:
iOS Management Console Settings
Android Management Console Settings
Windows PC Management Console Settings
Blue Settings in the Management Console
Billing
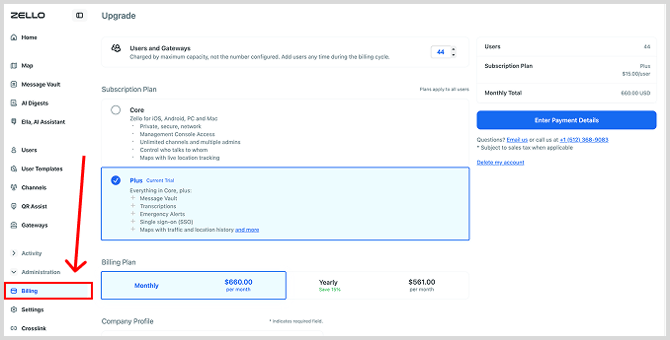
Primary admins use the Billing tab to manage the subscription and payment methods. From here you can change:
- The number of users on the subscription
- Payment frequency (monthly or annual)
- Payment method, billing contact, and company profile information
- Subscription tier and features (see the pricing page)
- Whether to pause or cancel the subscription
To open the Billing tab:
- Legacy interface: select Billing from the taskbar.
- Updated interface: click the down-arrow to expand the sidebar, then select the credit-card icon.
Maps
The Maps tab shows active users' locations on a live map. Up to 50 active users appear at once—use the search function to find a specific user, or the channel dropdown to view everyone in a channel.
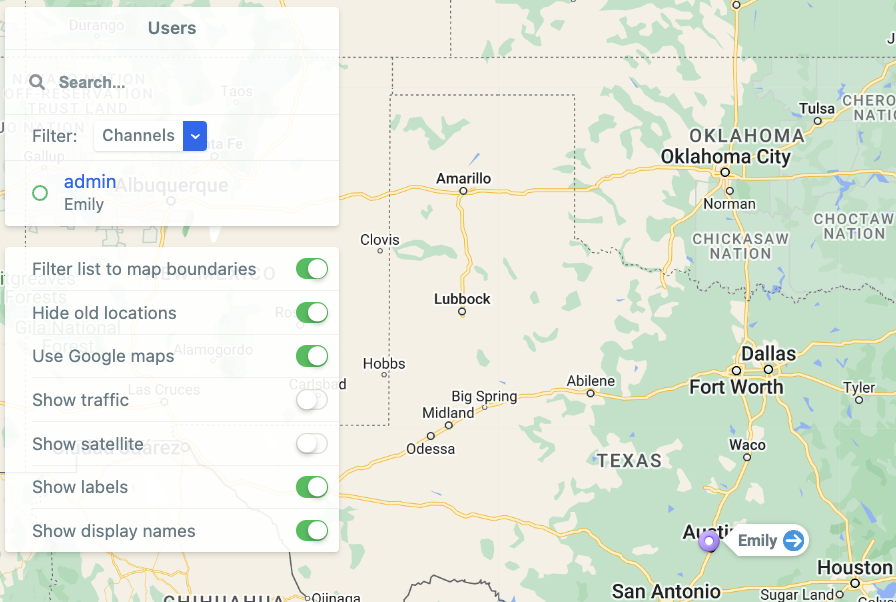
You can toggle the following map options:
- Filter list to map boundaries — Shows only users within the map boundaries you set.
- Hide old locations — Hides users whose location is 20 minutes old or older.
- Use Google Maps — Switches the view to Google Maps and enables the traffic option.
- Show traffic — Overlays real-time traffic from Google Maps. (Plus and Enterprise only.)
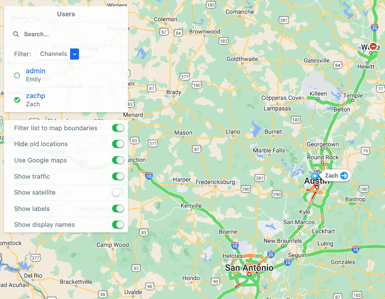
- Show labels — Attaches a username or display name to each dot on the map. When off, users appear as unlabeled dots (click a dot to see the user's details).
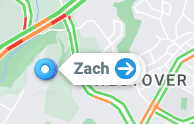
- Show display names — Identifies users by display name instead of username.
Click a connected user's name to see their exact location, timestamp, battery level, speed (if moving), and location breadcrumb history (breadcrumb history is Plus and Enterprise only).
Message Vault (History)
Message Vault lets network admins keep a comprehensive archive of all messages sent and received across the network. This appears as the Message Vault tab (updated interface) or the History tab (legacy interface).
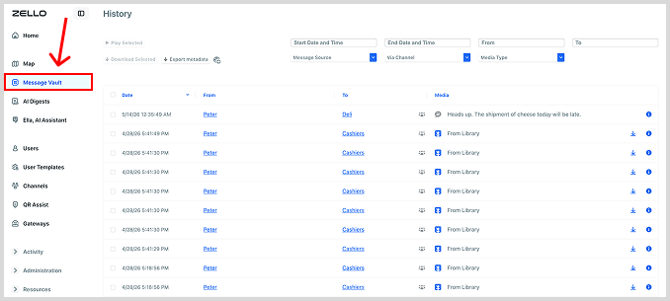
For each message you can see:
- Date, sender, and receiver
- The channel it was sent to
- The message content
- The message ID number
Messages can be replayed, downloaded (voice or image), and their metadata exported. You can filter by time period, channel, media type, date, or user. Messages are stored for two years and listed most-recent first. Channel messages, direct messages, and dispatch calls are all included.
Furthermore, Message Vault can also be anonymized for organizations with privacy requirements, including GDPR-regulated businesses, unionized workforces.
Message Vault is available on the Plus and Enterprise tiers. See pricing for details.
Dispatch Analytics
The Analytics tab provides data-driven insight into your dispatchers' productivity, including:
- Number of new calls
- Number of dispatchers currently active
- Average time to answer a call
- Average call length
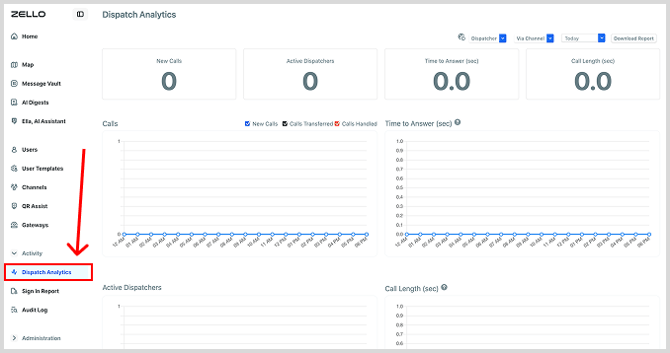
You can filter this data by date, channel, or dispatcher, and view user-specific stats for individual performance. Learn more about creating dispatch channels.
To open Analytics:
- Updated interface: go to Activity > Dispatch Analytics.
- Legacy interface: open the Analytics tab in the taskbar.